Friday, 31 October 2008

Arduino meets "The Frog-Prince"

Since the mouth of the frog is slightly too small, I need to take out a bit more of inside of the frog. I cut out a small slot in the inside of the mouth and then I can pull out a little of the content.

It seems to be a little more difficult to get everything at the right position. The eyes (LEDs) obviously need to be there were the eyes of the frog are already. I cut two holes from the back of the eyes to get the cables of the LEDs get through the fabric. It seems quite hard, but once their are inside, they do not move and fit properly.

On the arduino board and the blackboard I am using, I tight up all wires as short as they can possibly be. By doing this, I hopefully avoid that wires loosen when I enter everything into the frog's mouth.

By now I also know the name of the project. "The Frog-Prince".


The toy without its case


My aim was to put different functions into one program, to challenge the Arduino board and to see how much you can do by only using Arduino programming.

I the video, you can observe three different functions.
1) movement - melody
The circuit is the same as the one of a push button. When the frog is taken away from a sitting position, the circuit is interrupted and an alarm will ring and an LED will be switched on as long as the frog is sitting again.
2) distance - melody
A ping sensor is monitoring the distance in front of it. Once the distance is at a certain value, a melody will start playing and an LED will be turned on.
2) light - led (bluring)
There is also a photo cell. This sensor measures the light intensity. When it is quite dark an LED will start glowing. If it is light, it will be turned off.

Turning point for the whole project!!!

It is the morning of the 31st of October. Tonight many children are going to walk around in their neighborhood and ask for sweets.
Due to the fact that out presentation did not take place on the 28th of October, but is going to be on the 4th of November, I decided to get a new fresh pumpkin. Yesterday, I went to my local ASDA store. There were no more pumpkins! The flowershop close by offered only very small pumpkins. The owner said that this year, there is a shortage of pumpkins. Well, I thought then I will have to stick to my old one.


However, when I double-checked the pumpkin this morning, something seemed wrong. The dog did not stop sniffing around it. When I opened the top, I realized that there was mould inside it.


Today, I tried again to buy a pumpkin, but there was no way that I could find one.

So, I decided to change the project dramatically. The main item/concept will be changed. I am not using a pumpkin anymore.


I discovered this delightful object. The fact that it came with chocolate may have influenced my decision, nevertheless the main reason of choosing this frog is that it contains a bag inside its mouth. This bag hopefully provides enough space for the Arduino as well as the sensors and cables.

Sunday, 26 October 2008

Pumpkin Carving II

Finally, I bought a pumpkin and can start preparing it. I did not want to buy it too early, because I am not sure how long it may last.

Once I started cutting the top off, it seemed quite easy to cut into the pumpkin. However, when I discovered how much there was inside, I felt slightly disgusted. It did not smell like lovely pumpkin soup, but of some unripe vegetable. It was not very difficult to get all the content out, but the space inside the pumpkin was surprisingly small. At that point I started wondering whether there will be enough space for the arduino board as well as the sensors and so on. Moreover, I realized, it will definitely be a challenge to keep all the cables and wires dry.

Then I cut out the eyes in form of stars. Though that may seem strange for a Halloween pumpkin, I do not intend to make the pumpkin look scary. It is going to be a friendly pumpkin, maybe even a pumpkin girl. Behind the holes of the eyes, I put colored plastic stars. Their surface will hopefully be large enough to show the LED's light effectively from within the pumpkin. The next step is the mouth. I let her show her tongue considering that there will need to be space for the Ping sensor, so nothing should get into its way and the real distance in front of the pumpkin can be measured. 

Next step

For the first assignment my aim was to create a program entirely with Arduino
using sensors.
The final assignment, however, should also include motors.
I feel very confident to use sensors now. Putting them correctly into the circuit,
viewing their values in the serial monitor and transferring it into a function.

Piezo Buzzer, finding the right tune

Piezo buzzer:

I am using a piezo buzzer to play a melody as soon as something gets to a certain distance to the pumpkin i.e. the ping sensor hidden inside the pumpkin.

According to the Oxford Dictionary, piezoelectronic substances have the ability of converting mechanical substances (such as sound waves) into electrical signals, and vice versa.

Piezo buzzers use an oscillating voltage that alternately "squeezes and releases" the component. That is the process that produces the sound. You can get piezo buzzers with or without a case. The ones without a case are usually not as loud, but may be better usable as sensors.

Melody:

It turns out to be quite difficult finding a melody by looking on the Internet. Most notes you can find on the internet are not for free. In the end, the only way I find something is by looking for pictures.


The first notes of "Oh! Mactavish is dead" shall be my Halloween notes. 
To play a certain note, the piezo buzzer needs to receive information about the specific frequency.

On the Arduino Homepage:

Frequencies and their appropriate note can be looked up at this page.

Though I am not quite good at notes, I believe to be able to interpret the notes of"Oh! Mactavish is dead!" to:

c (4186), b (3951), a (3520), f (2793), f (2793), a (3520), f (2793), a (3520), c (4186), e (2637), e (2637)

Pumpkin Carving

I have never carved a pumpkin in my life! Though in my home country everybody knows about pumpkin and Halloween, not many people actually celebrate it, so not many people do the pumpkin carving.

I will try to find some tips and advice on preparing the pumpkin and carving on the internet.


When everything is taken out of the pumpkin, I also need to make sure that the Arduino does not get in touch with the wet surface. I may need to put all electronics into small plastic bags. The sensors, however, cannot be covered and need to be fixed carefully.

Thursday, 23 October 2008

Pulse Rate Monitor


As an additional tool for my first project, I found a pulse rate monitor kit. Even though I have never done something like that before, I wanted to know whether I would be able to make it working.

The pulse rate monitor is working with an infra-red radiation that detects the pulse. The output will hopefully be visible in form of an LED as well as a tone.

Overview:

After having identified all the different components, they need to be put into the proper place, so I can start soldering.

In the end, the external battery needs to be added and the LEDs need to be fixed. Here, special attention has to be taken with the LEDs polarity.

Though I put everything together as it ought to, soldered carefully and recognized the appropriate polarities, it did not work. I am aware of the reason, but I heard that these kits are not the most reliable ones. Well, the pumpkin will do without. It is just a shame, since this additional device would have enriched the project as a whole.

Pumpkin - Putting codes together

Grrr, I thought it would never happen. How difficult can it be to put a few codes together and make it work?

Well, my aim is to play a melody and turn on a LED as soon as you get at a certain distance to the ping sensor. I had already managed to make the LED when getting close to the sensor. Now I also need to make the piezo buzzer play music, or at least a few tones.

Although, there are a few examples on the Internet, none of them exactly did what I was looking for. Some just simply played a melody with no interaction and some played a note sent via the serial monitor. After a lot of testing, I was able to take the parts I need and put them together in the right order.

Though, the code still needs improvement, I came up with a working code! The secret was to write an additional function (scale(), for example) and to call it when it is needed within 'void loop()'. So, the 'loop' function would test all over again whether the ultra sound value is higher than 200. If that is the case, the 'scale' function would start.

The next step will be to go over the code and tidy everything up a bit, as well as to get red of unnecessary code. Moreover, I will need to find a melody that goes with Halloween.

Tuesday, 21 October 2008

Experimenting for pumpkin project


First of all, I start off with repeating a few things. Letting a LED blink, switch it on and off with a button, as well as influence its blinking speed.

LED blinking:
Switch:
Here I tried to imitate a switch:
Using the ping sensor with one LED:
... with two LEDs in series.
PING sensor with Piezo buzzer:
... even the dog likes it.

Which sensors would be useful for my project?

Photocells measuring the light
Ultrasound sensor (PING Range Finder
Simple buttons (Contacts)
Microphone
Potentiometer?

Which kind of reactions could be done by the pumpkin?

Certain noise when moved and contact is interrupted (simple buttons)
Light change when coming closer possibly demonstrated by using a piezo buzzer
Light change depending on light intensity around
Possibly a tongue showing or turning eyes...

Arts and Vegetables

Painting:

Image:Arcimboldo Vegetables.jpgArcimboldo_Vegetables.jpg 1504×2000 pixels

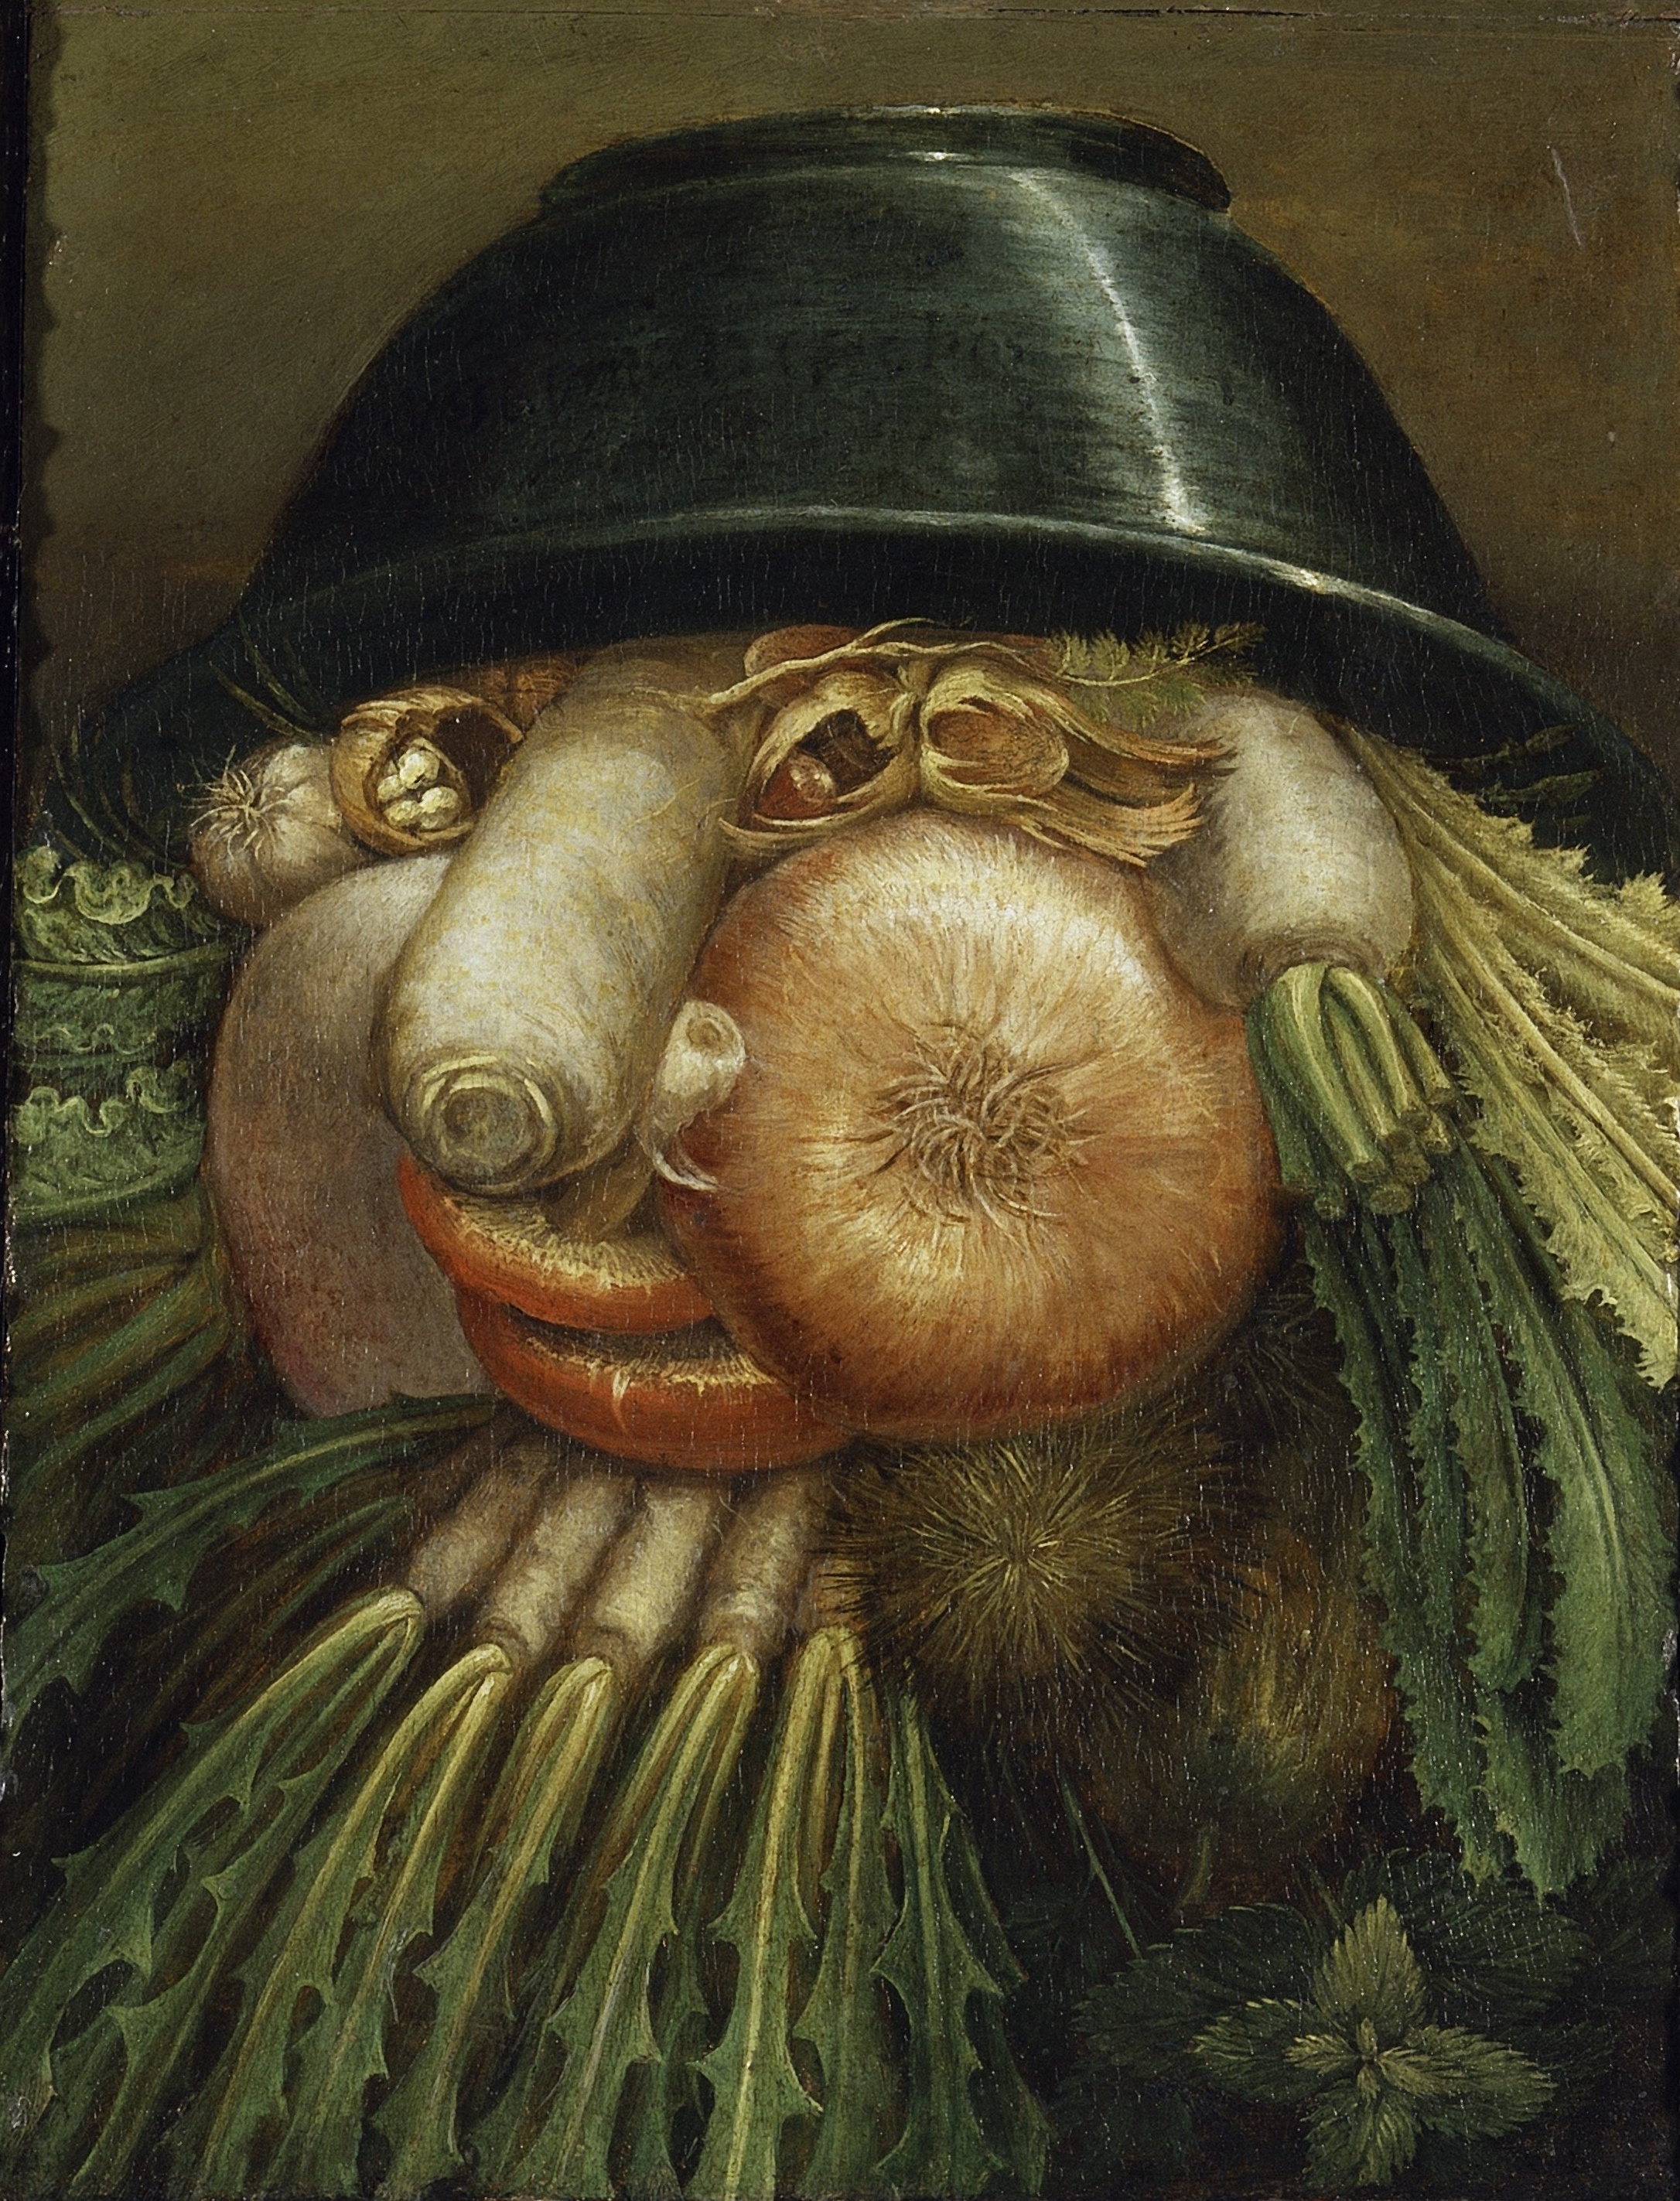
This painting is "The Greengrocer" by Guiseppe Arcimbolo. The 16th century Italian painter became famous due to his unique portraits which are painted out of items such as vegetables.

Other vegetable art:

food-art-fish
food-art-penguins

food-art-sheep

There are artists who are specialized in Halloween themes. Jan Pierce is one of them. She painted the following piece.


In combination with electronics, vegetables art does not seem to be that common.

However, interactive objects are not a rarity and that is exactly what I seek to create. Visiting an art exhibition and interacting directly with the art object itself  is a great experience. I wish to achieve a similar feeling with my project.

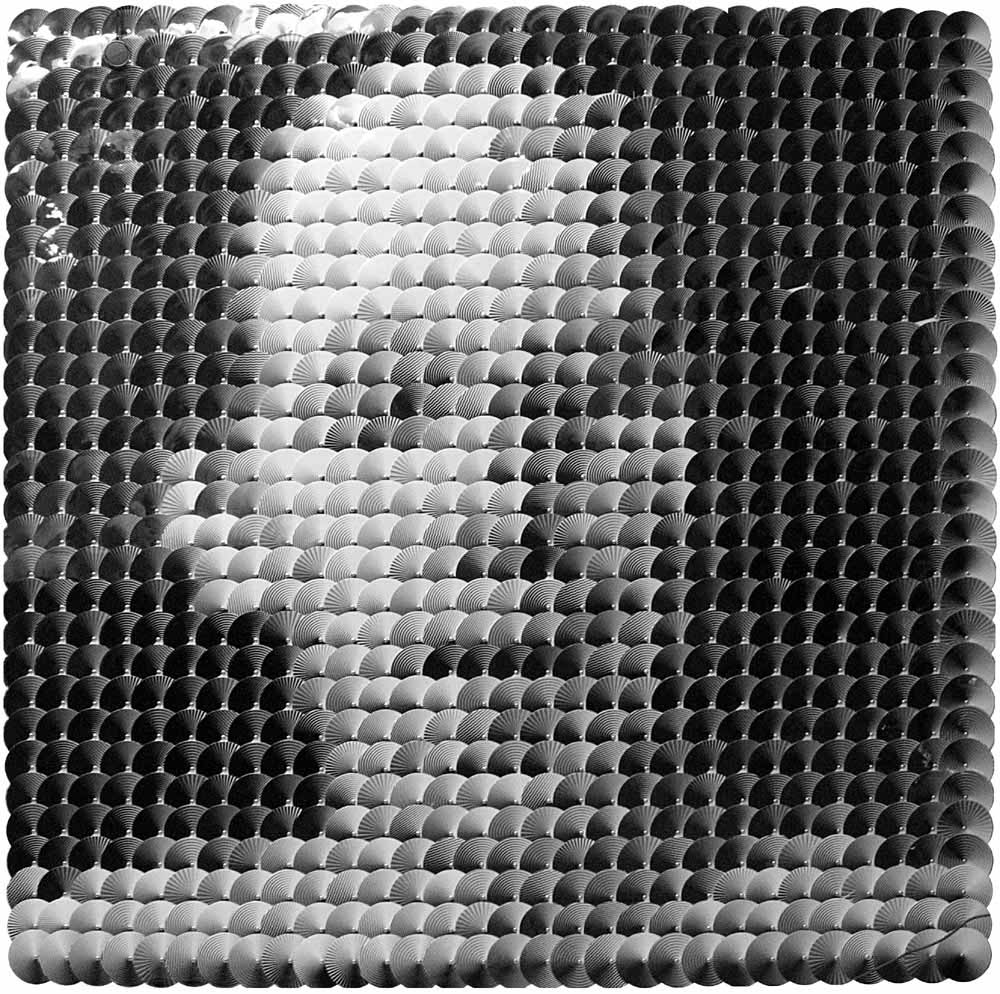
I am still very much fascinated by Daniel Rozin's mechanical mirrors. I only just have become aware of his "Circles Mirror".


"Circles Mirror is a mechanical sculpture made of 900 overlapping circles with patterns printed on them and connected to motors, computer and video camera. Any person standing in front of the piece is reflected on the piece by the circles rotating to expose more dark/ bright patterns as needed. The piece utilizes 12 different patterns of radial gradation from black to white which are randomly placed on the board. This piece is the first of my mechanical mirrors to incorporate elements of computer graphics and as such is an interesting middle between my print and physical works."


I also like projects which use light as their interactive response very much. I found one on YouTube, but unfortunately, I cannot find out who the artist was.


Depending on the color of the object laying on top of the table, the table will adapt the color. Actually, it is similar to a chameleon. I would like to employ the element of responsive light in my project too.

Another interactive art object I would love to see myself is "Thermosthesia".


With the aid of 80 peltier modules the table generates temperatures ranging from 5 to 45 degree celsius that can be felt directly by touching the surface. The user's hand position is recognized by infrared light diodes. So when moving the hand on the surface, the graphics as well as the temperature interact with the user.

Pumpkins...

At Halloween pumpkins are usually transformed into lanterns with scary faces on them. Their contents is taken out, a face is carved on the front and a candle lights up the pumpkin from inside.

Surprisingly, long before the pumpkin became a symbol for Halloween, it was only associated with the harvest season in the United States.

Also called as "Jack-o'-lantern" in North America, pumpkins are well known for being associated with Halloween all over the world.

Image:Jack-o'-Lantern 2003-10-31.jpg
http://en.wikipedia.org/wiki/Pumpkin

Thoughts about first Assignment

I would like the first Assignment or Mini-Assignment to be a preparing project for my final project. It should already make basic use of  sensors and is supposed to interact with the observer. Moreover, I would like to produce something that would be of any use for me. Though the use may not be practical, at least it should be entertaining.

Important to remember for this project is that all cables and wires are supposed to be invincible.

Due to the fact that within the week of submitting the assignment Halloween takes place and pumpkins are just everywhere, I had the idea of building an interactive pumpkin. I would get to experiment with different sensors and cables and wires could be easily hidden within the pumpkin.

With the finished pumpkin I could scare my friends at a Halloween party or leave it in front of my door to intimidate passing people.

Tuesday, 14 October 2008

1) Hearing 2) Seeing 3) Speaking...

Ideas for Final Project

With my final project I would like to conclude my learning process. I intend to use different kind of sensors. Since the beginning of the course I have been very much interested in the use or sensors, as they make the user-object-interaction inevitable.

At a promotional event, I received three little cow figures. Recently, I found them again. When 
putting them next to each other, they remind me of the three wise monkeys.

Image:Three wise monkeys figure.JPG

"See no evil, hear no evil, speak no evil" is the message they embody.

Well, since my figures are no monkeys, but little cows, the message could differ, couldn't it?

They definitely have character those cows. They look quite funny and due to their soft material, I am sure they are also easily modifiable.

Obviously, one cannot see, one cannot hear and one cannot speak. For all those properties we have been introduced to specific sensors.

1) Hearing
2) Seeing
3) Speaking


Supporting Software

In our Maverick Machines project we made use of Max/MSP, which is a graphical development environment. It helped us to progress recorded data. The sensor's (microphone) signal/data was taken to control a series of lights.

Unfortunately, Max/MSP is not an open-source software and quite expensive. Therefore, I am looking for alternative programs.

Processing, as a Arduino's sister project, seems to be another possibility to create similar work flows. A wide range of examples can be found under this link:


Since Processing is a designed to be used within a visual context, most examples found use the computer screen as output. Since for the first assignment, I was not going to use a computer screen to support my project, but wanted to use the Arduino board externally, the use of processing may be limited.

Anyway, despite the choice of all these programs, it should not be forgotten that Arduino software already offers many possibilities.

To memorize just a few of them, we repeated some of the basic examples. We managed to make LEDs blink, used a switch to control LEDs, made a ping sensor work...

Arduino - short time memory?

Arduino? Strange sounding word that sounds familiar. What was it again?

As far as I remember from last semester, the Arduino board can help artists to realize their project with relatively easy programming language as well as on a low budget.

What Arduino exactly is can be read on my "Maverick Machines" blog.