Saturday, 15 November 2008

Keith Newstead


Another very interesting automatist who creates mechanical sculptures is Keith Newstead. At the Cabaret Mechanical Theatre he found inspiration to produce his own mechanical life-like models. What makes him stand out from other automatists is the fact that he likes the working parts to be visual. He believes that mechanical devices can look quite elegant.


Though I will not have as many mechanical devices, I will have electronic once. There are artists working with electronics who seem not to be concerned about cables, power sources and circuits that are visual. When looking at Eric Raymonds work, I personally feel that it would have been so much better, if he had found a way to hide the wires etc. , so the observer does not get distracted. I am not sure why he did not try, but maybe he intended to express something with the slightly chaotic view. Since the landscapes he shows are of a natural origin, he may seeks to show the dynamic between nature and technology.

Since that is not my intension at all, I will not follow his route, but rather try to keep technology hidden.

http://www.keithnewsteadautomata.com/broadband.htm

Project Planning

For making the cows look like being on a stage, it is necessary to build a proper stage with curtains.

Curtain:
It turned out to be a problem finding the most appropriate fabric, so I found red tinsel instead. It looks quite striking and provides a festive touch. However, I have to be very careful when making holes in it, so it does not tear apart. Making the holes large enough to give room for the thread to get through smoothly, turns out to be quite a challenge. If it was some fabric with larger holes, moving the curtain along the string would be far more easy.

Shoe Box:

The stage itself is a shoe box. It is stout and has enough space for the Arduino and all electronics. The box should be large enough to support the three cows and to hold the curtain. I am painting the box in a friendly grass-green. Holes need to be cut out of the box, so the ping sensor can reach through the box. Flowers will be painted on the surface to hide the sensor.

Wednesday, 12 November 2008

Mechanics vs. Electronics

I am very much fond of mechanical projects. Automaticts such as Paul Spooner and Carlos Zapata have been creating very interesting work. The reason their work attracts me is because they kind of give an impression of being something like a toy. Moreover, the way they work is so fascinating. When you look at them you just want to find out how they might work.


Spooner’s mechanical artwork looks charming and you appear to feel sympathy for his characters straight away. It also provides a far more warm atmosphere than the metallic works of Jim Bond, for example.

Spooner mainly uses wood and warm colors for his works, which makes it look somehow more friendly. Though, not all of his plots make sense, his topics convey a certain type of humor. The following example, for example, is quite amusing.


The size of the work is usually quite small, which forces the observer to step very close. Sometimes the observer also needs to interact to drive on the machine. Every individual work appears to be on a little stage on their own. When you get very close, you may feel like becoming part of it. It is a rather an intimate experience.

For somebody as unexperienced as me it surely would be very hard to reproduce pieces that demand so much attention to detail and time. Therefore, I could start with producing only a few simple elements and allow the overall look of my work to be a little comparable with Spooner’s work.

Spooner’s work is usually presented within glass boxes. Unfortunately, that would be unsuitable for my project, since some sensors wont be able to work properly. Hence, I need to make sure I come up with an idea how to show my work, so interaction with the observer is possible, but also no destruction can occur. So, putting it up on a pedestal and protecting it with a surrounding fence is an acceptable solution.

Even though my Three Wise Cows project will be influenced by these mechanical applications, I will still use electrical means such as the Arduino. The result will be a mixed media object.

http://www.kinetica-museum.org/new_site/event_seminar_main.php?id=54

Monday, 10 November 2008

Cows and their traditional background

As I have already explained in a previous post, I am going to use little cows instead of monkeys for my project. I made that decision basically because the cow's depiction is very different in various traditions.

By employing cows I provide even more room for interpretation, since they have many traditional and religious meanings.

In Japan, there is a traditional toy in form of a cow that is supposed to protect against illnesses.

The Massai tribe in East Africa believe that all cows are God-given property.

Because they provide milk, in the Hindu tradition, cows are even treated with the same respect as one’s mother. They are a symbol of wealth, strength, abundance, selfless giving as well as full earthy life.


Sunday, 9 November 2008

Artists dealing with the Three Wise Monkeys

Keith Haring

Keith Haring is best-known for his graffitis inspired murals all over the world. As a social activist he also established the Keith Haring Foundation supporting organizations assisting children, educational organizations and research and care related projects to AIDS.

Haring was diagnosed with AIDS himself and created arts dealing with the disease.

Safe Sex

One of the paintings uses the three monkeys in form of three humans to convey the idea of ignorance.  I believe his approach is quite powerful. The three monkeys i.g. humans help very much to bring across his strong message.


Most other artists may use the Three Wise Monkeys, but usually far less dramatical.

Max Magnus Norman created interesting sculptures of the monkeys.
He portrays the monkeys by giving them by giving them rather modern devices. The sculptures look quite funny and surely act entertaining.

Due to their strong expressiveness, the monkeys are also used in caricatures. Here are some examples:


A few more pictures of the monkeys that indicate the wide range of styles:


Image:The three monkeys.png


Saturday, 8 November 2008

Three Wise Monkeys - Representation

Another great thing about the Three Wise Monkeys is that there are numerous ways of representation.

In Japan, for example, the proverb is seen as a Golden Rule. "Not to be snoopy, nosy or gossipy." Other early representations that link to Buddhist teaching claim "if we do not hear, see or talk evil, we ourselves shall be spared all evil." This may even be compared to the English saying "Speak of the Devil - and the Devil appears." A further depiction says that a person who does not experience evil through sight and sound, will not do any evil.

Nowadays, especially in the Western world, the words "See no evil, hear no evil, speak no evil" describe a person ignoring bad things happening around him. This representation, in particular, has been used by artists dealing with topics as oppressive as AIDS.

http://en.wikipedia.org/wiki/Three_wise_monkeys#Meaning_of_the_proverb

Three Wise Monkeys - Origin


One of the things I like about the Three Wise Monkeys is that their origin is not absolutely clear. The probably eldest caving is over the door of the 17th century shrine in Japan, Nicco. However, there is evidence that the history of the proverbial principle "See no evil, hear no evil, speak no evil" goes back even to the 8th century and the Tendai-Buddhist legend. Other theories claim that the saying initiated from a very similar Chinese phrase.


Friday, 31 October 2008

Arduino meets "The Frog-Prince"

Since the mouth of the frog is slightly too small, I need to take out a bit more of inside of the frog. I cut out a small slot in the inside of the mouth and then I can pull out a little of the content.

It seems to be a little more difficult to get everything at the right position. The eyes (LEDs) obviously need to be there were the eyes of the frog are already. I cut two holes from the back of the eyes to get the cables of the LEDs get through the fabric. It seems quite hard, but once their are inside, they do not move and fit properly.

On the arduino board and the blackboard I am using, I tight up all wires as short as they can possibly be. By doing this, I hopefully avoid that wires loosen when I enter everything into the frog's mouth.

By now I also know the name of the project. "The Frog-Prince".


The toy without its case


My aim was to put different functions into one program, to challenge the Arduino board and to see how much you can do by only using Arduino programming.

I the video, you can observe three different functions.
1) movement - melody
The circuit is the same as the one of a push button. When the frog is taken away from a sitting position, the circuit is interrupted and an alarm will ring and an LED will be switched on as long as the frog is sitting again.
2) distance - melody
A ping sensor is monitoring the distance in front of it. Once the distance is at a certain value, a melody will start playing and an LED will be turned on.
2) light - led (bluring)
There is also a photo cell. This sensor measures the light intensity. When it is quite dark an LED will start glowing. If it is light, it will be turned off.

Turning point for the whole project!!!

It is the morning of the 31st of October. Tonight many children are going to walk around in their neighborhood and ask for sweets.
Due to the fact that out presentation did not take place on the 28th of October, but is going to be on the 4th of November, I decided to get a new fresh pumpkin. Yesterday, I went to my local ASDA store. There were no more pumpkins! The flowershop close by offered only very small pumpkins. The owner said that this year, there is a shortage of pumpkins. Well, I thought then I will have to stick to my old one.


However, when I double-checked the pumpkin this morning, something seemed wrong. The dog did not stop sniffing around it. When I opened the top, I realized that there was mould inside it.


Today, I tried again to buy a pumpkin, but there was no way that I could find one.

So, I decided to change the project dramatically. The main item/concept will be changed. I am not using a pumpkin anymore.


I discovered this delightful object. The fact that it came with chocolate may have influenced my decision, nevertheless the main reason of choosing this frog is that it contains a bag inside its mouth. This bag hopefully provides enough space for the Arduino as well as the sensors and cables.

Sunday, 26 October 2008

Pumpkin Carving II

Finally, I bought a pumpkin and can start preparing it. I did not want to buy it too early, because I am not sure how long it may last.

Once I started cutting the top off, it seemed quite easy to cut into the pumpkin. However, when I discovered how much there was inside, I felt slightly disgusted. It did not smell like lovely pumpkin soup, but of some unripe vegetable. It was not very difficult to get all the content out, but the space inside the pumpkin was surprisingly small. At that point I started wondering whether there will be enough space for the arduino board as well as the sensors and so on. Moreover, I realized, it will definitely be a challenge to keep all the cables and wires dry.

Then I cut out the eyes in form of stars. Though that may seem strange for a Halloween pumpkin, I do not intend to make the pumpkin look scary. It is going to be a friendly pumpkin, maybe even a pumpkin girl. Behind the holes of the eyes, I put colored plastic stars. Their surface will hopefully be large enough to show the LED's light effectively from within the pumpkin. The next step is the mouth. I let her show her tongue considering that there will need to be space for the Ping sensor, so nothing should get into its way and the real distance in front of the pumpkin can be measured. 

Next step

For the first assignment my aim was to create a program entirely with Arduino
using sensors.
The final assignment, however, should also include motors.
I feel very confident to use sensors now. Putting them correctly into the circuit,
viewing their values in the serial monitor and transferring it into a function.

Piezo Buzzer, finding the right tune

Piezo buzzer:

I am using a piezo buzzer to play a melody as soon as something gets to a certain distance to the pumpkin i.e. the ping sensor hidden inside the pumpkin.

According to the Oxford Dictionary, piezoelectronic substances have the ability of converting mechanical substances (such as sound waves) into electrical signals, and vice versa.

Piezo buzzers use an oscillating voltage that alternately "squeezes and releases" the component. That is the process that produces the sound. You can get piezo buzzers with or without a case. The ones without a case are usually not as loud, but may be better usable as sensors.

Melody:

It turns out to be quite difficult finding a melody by looking on the Internet. Most notes you can find on the internet are not for free. In the end, the only way I find something is by looking for pictures.


The first notes of "Oh! Mactavish is dead" shall be my Halloween notes. 
To play a certain note, the piezo buzzer needs to receive information about the specific frequency.

On the Arduino Homepage:

Frequencies and their appropriate note can be looked up at this page.

Though I am not quite good at notes, I believe to be able to interpret the notes of"Oh! Mactavish is dead!" to:

c (4186), b (3951), a (3520), f (2793), f (2793), a (3520), f (2793), a (3520), c (4186), e (2637), e (2637)

Pumpkin Carving

I have never carved a pumpkin in my life! Though in my home country everybody knows about pumpkin and Halloween, not many people actually celebrate it, so not many people do the pumpkin carving.

I will try to find some tips and advice on preparing the pumpkin and carving on the internet.


When everything is taken out of the pumpkin, I also need to make sure that the Arduino does not get in touch with the wet surface. I may need to put all electronics into small plastic bags. The sensors, however, cannot be covered and need to be fixed carefully.

Thursday, 23 October 2008

Pulse Rate Monitor


As an additional tool for my first project, I found a pulse rate monitor kit. Even though I have never done something like that before, I wanted to know whether I would be able to make it working.

The pulse rate monitor is working with an infra-red radiation that detects the pulse. The output will hopefully be visible in form of an LED as well as a tone.

Overview:

After having identified all the different components, they need to be put into the proper place, so I can start soldering.

In the end, the external battery needs to be added and the LEDs need to be fixed. Here, special attention has to be taken with the LEDs polarity.

Though I put everything together as it ought to, soldered carefully and recognized the appropriate polarities, it did not work. I am aware of the reason, but I heard that these kits are not the most reliable ones. Well, the pumpkin will do without. It is just a shame, since this additional device would have enriched the project as a whole.

Pumpkin - Putting codes together

Grrr, I thought it would never happen. How difficult can it be to put a few codes together and make it work?

Well, my aim is to play a melody and turn on a LED as soon as you get at a certain distance to the ping sensor. I had already managed to make the LED when getting close to the sensor. Now I also need to make the piezo buzzer play music, or at least a few tones.

Although, there are a few examples on the Internet, none of them exactly did what I was looking for. Some just simply played a melody with no interaction and some played a note sent via the serial monitor. After a lot of testing, I was able to take the parts I need and put them together in the right order.

Though, the code still needs improvement, I came up with a working code! The secret was to write an additional function (scale(), for example) and to call it when it is needed within 'void loop()'. So, the 'loop' function would test all over again whether the ultra sound value is higher than 200. If that is the case, the 'scale' function would start.

The next step will be to go over the code and tidy everything up a bit, as well as to get red of unnecessary code. Moreover, I will need to find a melody that goes with Halloween.

Tuesday, 21 October 2008

Experimenting for pumpkin project


First of all, I start off with repeating a few things. Letting a LED blink, switch it on and off with a button, as well as influence its blinking speed.

LED blinking:
Switch:
Here I tried to imitate a switch:
Using the ping sensor with one LED:
... with two LEDs in series.
PING sensor with Piezo buzzer:
... even the dog likes it.

Which sensors would be useful for my project?

Photocells measuring the light
Ultrasound sensor (PING Range Finder
Simple buttons (Contacts)
Microphone
Potentiometer?

Which kind of reactions could be done by the pumpkin?

Certain noise when moved and contact is interrupted (simple buttons)
Light change when coming closer possibly demonstrated by using a piezo buzzer
Light change depending on light intensity around
Possibly a tongue showing or turning eyes...

Arts and Vegetables

Painting:

Image:Arcimboldo Vegetables.jpgArcimboldo_Vegetables.jpg 1504×2000 pixels

This painting is "The Greengrocer" by Guiseppe Arcimbolo. The 16th century Italian painter became famous due to his unique portraits which are painted out of items such as vegetables.

Other vegetable art:

food-art-fish
food-art-penguins

food-art-sheep

There are artists who are specialized in Halloween themes. Jan Pierce is one of them. She painted the following piece.


In combination with electronics, vegetables art does not seem to be that common.

However, interactive objects are not a rarity and that is exactly what I seek to create. Visiting an art exhibition and interacting directly with the art object itself  is a great experience. I wish to achieve a similar feeling with my project.

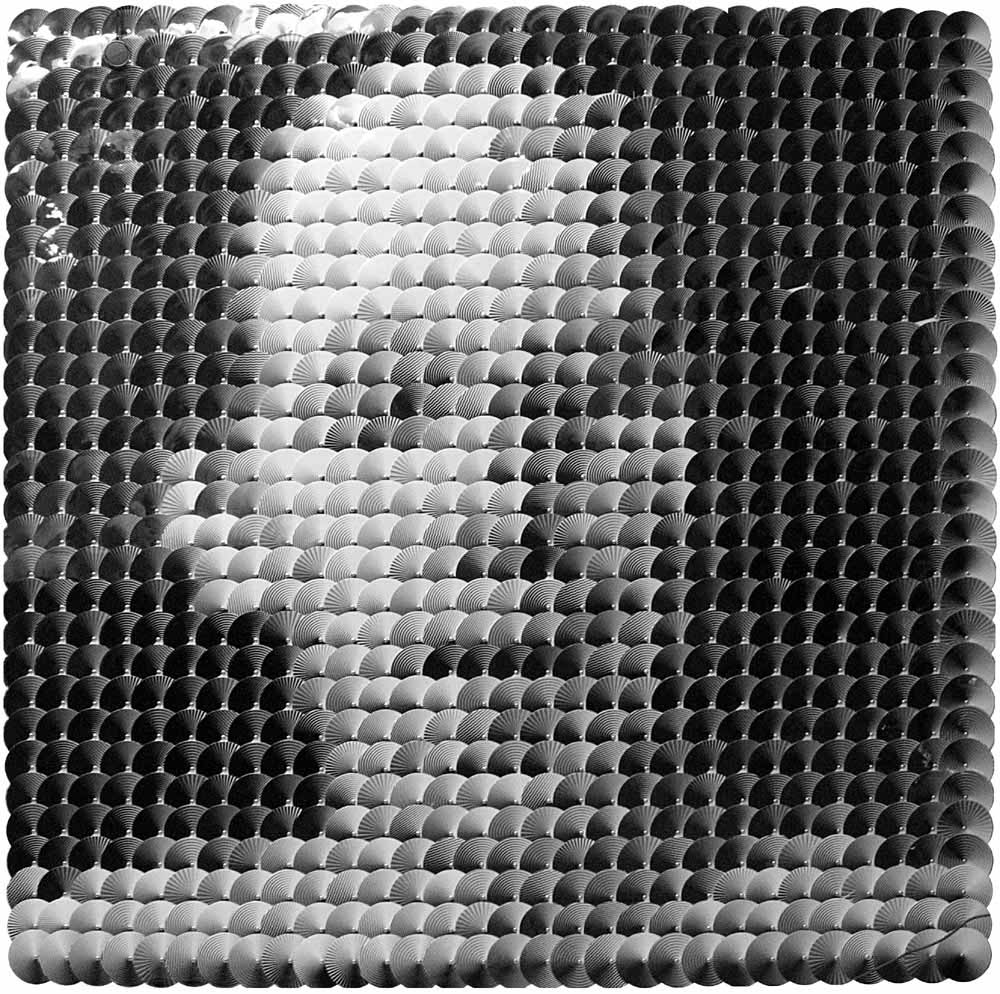
I am still very much fascinated by Daniel Rozin's mechanical mirrors. I only just have become aware of his "Circles Mirror".


"Circles Mirror is a mechanical sculpture made of 900 overlapping circles with patterns printed on them and connected to motors, computer and video camera. Any person standing in front of the piece is reflected on the piece by the circles rotating to expose more dark/ bright patterns as needed. The piece utilizes 12 different patterns of radial gradation from black to white which are randomly placed on the board. This piece is the first of my mechanical mirrors to incorporate elements of computer graphics and as such is an interesting middle between my print and physical works."


I also like projects which use light as their interactive response very much. I found one on YouTube, but unfortunately, I cannot find out who the artist was.


Depending on the color of the object laying on top of the table, the table will adapt the color. Actually, it is similar to a chameleon. I would like to employ the element of responsive light in my project too.

Another interactive art object I would love to see myself is "Thermosthesia".


With the aid of 80 peltier modules the table generates temperatures ranging from 5 to 45 degree celsius that can be felt directly by touching the surface. The user's hand position is recognized by infrared light diodes. So when moving the hand on the surface, the graphics as well as the temperature interact with the user.